Frequently Asked Questions
You can create a public web address for any project created in the OpenCities Planner Editor.
You can share your project as a 3D website for desktop and mobile, a 360° Panorama view for low-end/low-bandwidth devices, or the OpenCities Planner Offline application – built for showrooms and exhibitions.
You can also export videos and screenshots for custom sharing.
Yes, you can invite people to a project with either editing or viewing privileges. Users with editing rights can collaborate – including the ability upload and create content. Users with viewing rights are only able to view the project privately with their logged in user account.
OpenCities Planner is built with scaleble cloud architecture. Massive amounts of traffic poses no problem.
No, only one user can edit a project at once. If a user with editing rights tries to access a project that is already being edited, they will receive a notification of who the current user is and be logged in with view-only rights.
Yes, you can organize your content into groups and layers – with each layer representing a unit of time. Then, you can select to show the group with a Slider interface. This will show all the layers in the group as steps in a slider.
A common use case is showing how an urban development project is built over time.
The editor interface is currently available in English and Swedish. Everything in the published view can be translated in the editor.
Most world languages are supported – as any character represented in UTF-8 can be used to customize the interface.
When close to the ground or any surface, you can enter Gound View mode by doubleclicking on the surface that you want to ‘land on’.
In Ground View, you can look around with your mouse and click anywhere to move to a new position.
Right click to exit Ground View.
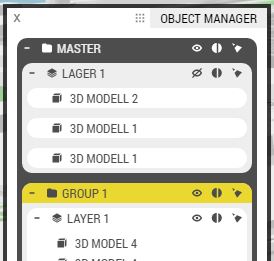
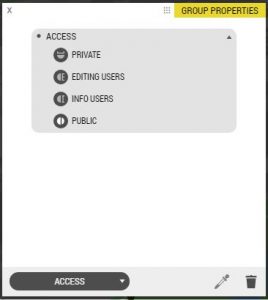
Groups and layers have to have the “Public” access setting to be shown in the public view of your project. You can change this in Object Manager. Just click the access icon for the group/layer and toggle through the options.

These same options are also available in the Properties Window subsection Access.

Technical
- Reality models, DTM/DSM, Ortho imagery, Point clouds, 3D city models / 3D models
- Vector data / Shape files, Images textured on the terrain (e.g. a plan illustration map)
- Customizable Points of Interests / Placemarks and Details Windows with options to include text, images, attachments, and sharing or embedded websites & videos
- Questionnaires, Geospatial forms
From ContextCapture, export as LODTree XML with “Quadtree tiling across tiles” enabled. Add the exported files to a ZIP-file and upload using DataManager or contact Bentley for guidance.
Note: Using georeferenced data is recommended
OpenCities Planner can read Collada (.dae) and KMZ files. Use Collada if the model is georeferenced in a local coordinate projection and use KMZ if the model is georeferenced in WGS84.
Note: KMZ will automatically embed textures into the file. For a Collada export this is done manually by zipping the .dae file with the textures into a single file.
The preferred content pipeline is to create an iModel and synchronise your BIM and engineering files to the iModelHub. This will preserve the fidelity of your original files, maintain the attributes and enable streaming of the data. Read more about iModels and OCP here.
If you’re not on an Premium OCP subscription, you can export your files as Collada or KMZ. Several 3D authoring tools can export either Collada or KMZ. For instance, you can use Microstation or OpenCities Map to import CAD/BIM files and then export as Collada – which can then be imported into OpenCities Planner.
Other methods of exporting
How to export to Collada:
- Lumion® LiveSync® plugin for most 3D authoring tools
- IfcOpenShell
How to export to KMZ:
- From Revit: CADtoEarth.Revit
- From AutoCad: https://www.youtube.com/watch?v=UxUqQ9S87W8
- From ArchiCad: https://www.youtube.com/watch?v=YvE9pkFpZ8Y
It is recommended to keep your 3D model as small as possible, especially if your project is designer for public publishing.
The number of triangles will impact size and rendering. Don’t ‘waste triangles’ on unnecessary details. Textures also have an impact, both size and resolution. Size will impact download speed while texture resolution will impact rendering speed. Don’t use high resolution textures unless such detail is required. Try and keep image resolution under 2048×2048.
Read more how to prepare your 3D model for OpenCities Planner
WebGL enabled web browser is required.
Minimum Desktop:
- CPU: i5
- RAM: 8GB
- Graphics card: Intel UHD 630 (Nvidia or ATI GPU recommended)
- OS: Windows 7, OS X 10.8 Mountain Lion
- All modern browsers
iOS:
- Device: iPad Mini 4 or iPhone 8
- OS: iOS11or newer
- Mobile browser, no downloads required
Android:
- OS: Android 10 or newer
- Mobile browser, no downloads required
For more information:
Click Here