When working with 3D models for real-time visualization it is important to follow a set of basic rules to create a resource friendly model. A demanding model is often perceived as slow and it can even make the computer crash or hang. This phenomenon is usually seen on older computers but it can also occur on new laptops and workstation if the model is extremely demanding. How optimized and resource friendly a model is, is determined by a number of factors such as the number of textures, the total number of pixels in a model ( i.e. the sum of width x height for all textures), the complexity of the topology, the number of layers in the model and the number of materials.
3D Modeling for OpenCities Planner
Quick checklist for 3D-models
A models size on disk determines how fast the model will load over the network. The loading time affects the user experience and determines the time it takes for a user to get a final picture of the current view. It is desirable to create models that are small in disk size so that users with a slow Internet connection still can view the material without waiting.
By optimizing for these factors it is possible to create a model that works for a broad range of users in a heterogeneous computer environment. Below follows a compilation on basic requirements and tips and tricks for how to create and/or prepare an existing model for use with Agency9 OpenCities Planner.
Basic requirements for a 3D model
- All models must be in COLLADA 1.4.1 or KMZ file format with UTF-8 encoding
- All surfaces must be created from triangles
- All textures must be in JPEG or PNG format
COLLADA 1.4.1
COLLADA is an XML based data exchange format for 3D objects. The specification is defined by Khronos Group and is free and open for all to implement. Today COLLADA is supported by several major 3D and CAD applications and tools. The file ending for a COLLADA file is often .dae but sometimes .collada is also used. If you want to examine the content of a COLLADA file it can be opened in for example Trimble Sketchup. Sketchup is free to download and has good support for COLLADA.
KMZ
A KMZ file is a zip compressed file containing a KML file, one or more COLLADA files and/or one or more texture files. To examine a KMZ file the file ending can be renamed to .zip and then unzipped with WinZip or WinRar. When unzipped, the created folder should contain one .kml file, one or more .dae files and might also contain one or more .jpg, .jpeg or .png files.
Note: Some KMZ files contains a .kml file only without an accompanied .dae file. This format is not supported by Agency9 3DMaps or Agency9 OpenCities Planner.
If your tool doesn’t support COLLADA or KMZ
If your tool doesn’t support the COLLADA or KMZ file format it might be possible to export to COLLADA by using a third party tool. Autodesk Maya, Autodesk 3D Studio Max, Trimble Sketchup or Safe Software FME has support to read a broad range of different 3D file formats and can be used to export to COLLADA. Lookup the formats your software supports and maybe export to a format that can be imported in one of the tools mentioned above.
Structure of the 3D model
When creating 3D models there are some things to keep in mind to make the model usable within Agency9 OpenCities Planner:
Surfaces
All surfaces should be created from triangles. This is due to the fact that your graphics card is specially designed to render triangles, and lots of them. Therefore it is important to convert all surfaces to triangles before exporting them to COLLADA. In some software there is automatic support for triangulation when exporting to COLLADA, in others look for a command in the modelling tool. The tool for triangulating surfaces is often called triangulate or triangulation. Read the manual or use the help function to get more information on how to use the triangulation in your software.
Clean up the model
It is important to clean up the model before exporting. Remove all excess information that is not relevant for visualization of your model. It can be CAD header information or other types of assets that are connected to the model. These assets are known to cause problem when exporting and later used in OpenCities Planner.
Make sure that there are no parallel surfaces very close to each other. These surfaces gives rise to a rendering artifact known as Z-fighting which causes flickering in these locations.
Optimize and simplify models
Often models exported from CAD tools are very detailed. Examine the model and try to figure out which details are of importance for the model and which aren’t. It is god practice to remove geometry that has little or no importance to simplify the model so that it loads quickly and works on most computers. One example can be to remove the interior of buildings that can’t be seen from a bird’s eye perspective, thus reducing complexity without loss of visual quality.
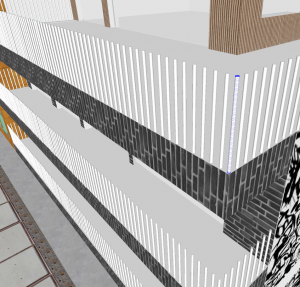
It is also important to simplify spherical shapes, cylinders or other types of natural surfaces since they need lots of triangles. These triangles increase the file size and can drastically reduce rendering performance. An example can be to simplify poles and fences to octagonal-or hexagonal prisms, or even represent it with a texture on a simple surface.
Try to simplify and replace geometry with texture for objects that are really small such as window frames and door handles. Details on these types of objects are often too small to be seen in a map compared to the resources devoted to them.
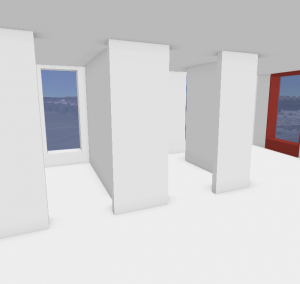
Many semi-transparent materials like windows can impact the performance of your model. If there is nothing important to see through into, then refrain from using semi-transparent surfaces.
Examples:


Textures
All textures should be in JPEG format except for textures that contain transparency or an alpha channel. Those textures should be in PNG-format.
- The size of a texture is determined by its width and height (pixels).
- Textures should not be larger than 1024×1024.
- For small details, avoid using textures larger than 64×64.
- The size of the texture should reflect the size of the object (surface) it represents.
- Large rectangular surfaces should be textured with large rectangular textures.
- Small quadratic surfaces should be textured with small quadratic textures.
- Minimize the number of textures used and try to use large but few textures instead of many small. Combine many small textures into a large texture if your 3D/CAD tool supports texture mapping.
- Texture coordinates should be between 0 and 1 (more on that below).
You can use Paint.net, Picasa, Photoshop or similar applications to verify and change the size of the textures.
Texture coordinates
When a texture is applied to a surface, a mapping is done between each corner of the surface and a fixed position within the texture. The position within the texture is represented by a value between 0 and 1, in both the x- and y-direction. For example, the position att the bottom left in the texture has the value [0.0, 0.0] while the position at the top right has the value [1.0, 1.0]. Note that pixel positions is not used here.
To get the best possible performance in Agency9 OpenCities Planner and Agency9 3DMaps, the texture coordinates must be between 0 and 1. Avoid repeating a texture on the same surface because this will lead to texture coordinates outside the interval 0 to 1. Instead split the large surface into many small surfaces and texture each small surface with the same texture.
Geo referencing
For the KMZ file format, the only coordinate system you can work in by definition is WGS84. On import to OpenCities Planner, the coordinates will be transformed into the project coordinate system and vice versa on export as KMZ from OpenCities Planner.
For COLLADA (.dae) file format, you should work in the project coordinate system since no transformation will be done on import or export.
On import, the origin of the 3D-model will be recalculated to the center of geometry in the model. So if you’re working with a reference coordinate, that coordinate should be transformed to the same position if you want to enter the reference coordinate manually.
If you are working with a georeferenced CAD model in AutoCAD, Microstation or similar 3D-authoring tools, you can save the model as DWG or DXF and then use Sketchup Pro to import it into Sketchup for transformation into Collada format before uploading into OpenCities Planner. It is crucial that you in the Sketchup import window for DWG/DXF choose the Option “Preserve drawing origin” and then export as Collada. This will keep the georeferencing from your CAD-application.
You can also use the 3D export tool in OpenCities Planner to export an area of the 3D-city model. The exported area will be georeferenced, so if you for instance import it into Sketchup for further 3D-modeling, your new content will be georeferenced correctly.
Miscellaneous
Organize and group your models. This will make them easier to use and maintain, and simplifies reducing of quality if needed.
Give your files a name that reflects its content. Only use ASCII128 compatible characters in names. Characters such as å, æ, ø or ß may cause problems for international users, on some networks and in some softwares that doesn’t support unicode.
Use _ instead of whitespace to avoid problems with URL references.
Read more
Sketchup has a great document on how to model low-poly with Sketchup. Click here to view it.