3D Models are one of the cornerstones of OpenCities Planner. Here we will learn how to upload them!
Uploading 3D Models
World Building
There are two ways to upload a 3D Model.
- Simply Drag & Drop a KMZ or DAE anywhere on the OpenCities Planner Interface.
- Open the 3D Model Tool:
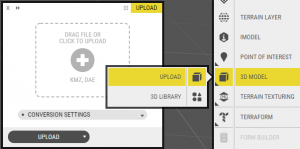
3D model window - You have 2 options available for your model’s Conversion Settings, both only affecting KMZ models:

A. Ignore KML orientation. This will ignore the orientation specified within the KML file that exists inside the KMZ. In some cases, the geometry of our model has the orientation already, as some Sketchup versions export a double orientation. However, as the same is already been added to the KLM file, your model will end up being rotated too much.
B. Do Geographic Transformation. This will scale and rotate the model according to where it is placed in the world and in which coordinate system it will exist in. For a model to look as expected, this option should be chosen. However, if your model is in KMZ format but not georeferenced and you try to perform the Geographic transformation, it will try to scale and rotate it to the coordinate system specified on your project and thus your model will fail to comply. What needs to be done is to ignore the geographic transformation as your model isn’t expected to use it and then upload your model successfully.

4. Then click the button to locate a local file to upload your model or drag and drop it here.
Basic Task & Example
Task: Upload an 3D Model and use the positioning tool to make it look like it fits in your area.
If you don’t have a model of your own, here’s a sample you can experiment with: OpenCities Planner Tower. Here we’ve added the model to Södermalm, in Stockholm: