You’re surely eager to begin working on a lot of different projects. Let’s start learning how to create, save, and manage them.
Project Management
My First OpenCities Planner Project
Most of the buttons you need are found on the left side of the Top Bar.

- New – Simply click the plus button to create a new project. If you have unsaved changes, a confirmation window will appear.
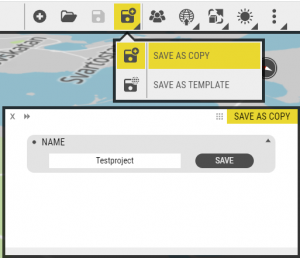
- Save and Save As – These Saving buttons need no explanation. From Save As, choose “Save As Copy” to change the title of your project (we’ll learn about saving backgrounds as Templates later).

Open & Delete Projects with Project Manager
Need to open a project? Look no further than the Folder icon, between New and Save in the Top Bar. This button opens Project Manager. Here’s an introduction to the basic functions:
- Sort & Search – Use the Search section at the top to find specific projects by name, or click the column headers sort by date or alphabetically.
- Tabs – Use the dropdown button at the bottom of the window to change tabs (Administrators can view all projects in their Organisation, as well as manage templates/Backgrounds).
- Delete – Delete the highlighted/active project with the trash can icon at the bottom of the window.
Once you’ve been working with OpenCities Planner for a while, you’ll likely have more than a few projects saved so it’s wise to get comfortable with Project Manager.
Task: Delete a Project (careful now – don’t remove anything important!)