New to OpenCities Planner? Wondering how to get immediate value with minimum effort? Here are four things you can do right now.
1. Save time and frustration by sketching and visualising in OpenCities Planner
3D authoring tools like Sketchup, AutoCAD, Maya, and others are great for actual detailed modelling you sometimes need to do – but when you need to visualise a larger project with several buildings plus existing terrain and houses, those tools simply won’t cut it. You’ll spend a good portion of your day waiting for the application to become responsive again while you dream of hardware upgrades.
With OpenCities Planner, you can do the basic sketching directly in the entire 3D city model with no need to worry about performance or application-freeze-syndrome.
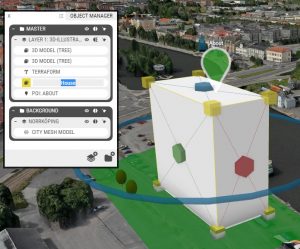
You can add 3D volumes, set dimensions, and create basic visualisations within minutes.
Alternatively, you can import your CAD models and create the scene directly in OpenCities Planner. Voilà, in no time at all you’re able to do shadow analysis and line of sight visualisations from any point in the 3D city.
Bad news though… you won’t need that hardware upgrade.
2. Save cost by avoiding software installation just to view a 3D scene
So you’re the team visualisation expert. You’ll need a bunch of different applications to create and visualise projects. Then one day you find yourself surrounded by a team of stakeholders who all need access to view project content.
You may be tempted to purchase more licenses of your 3D authoring application so you can share your content with all members in the team, but that drives cost up exponentially. Conversely, you might need to schedule meetings every time you update the model in order to share your work with the team, but that is quite inefficient for all involved.
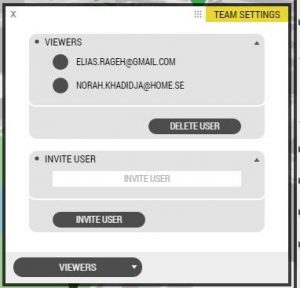
In OpenCities Planner, you can invite team members with just a few clicks – instantly granting them viewing access to your project. Click the Team button, change to the Viewing Members tab, and type in the emails of all the people you want to invite. You can even add a Dialogue form to get instant geo-referenced feedback from your team members.
A single minute of work for you, with no added cost plus days of work saved for your organisation.
3. Make revenue with the Export 3D tool
With the built-in Export 3D tool, you can drawn an area in the 3D map and export as a 3D-model in Collada or KMZ. No need to build a custom FME-script or develop your own dedicated solution to do simple exporting from your 3D city model. With OpenCities Planner, you can navigate to any area of your 3D city model, visually inspect it and then export it. What you see is what you get.

The exported model will be geo-referenced so you can use it in other GIS-systems or import it into 3D-authoring tools such as Sketchup, AutoCAD, Maya, and others.
After making changes, you can re-import your 3D-model drawn on the background to OpenCities Planner and maintain geo-referencing. This is a way better method of doing geo-referencing than, for instance, using Google Earth terrain like the geo-referencing tool in Sketchup does because your 3D city model most likely has better precision than the Google Earth terrain and will be more accurately positioned in altitude.
Another use case is sending an exported 3D-model to external consultant working in your project as background material to draw on.
Maybe you even can turn it into a revenue stream by selling the data to real estate developers or other types of commercial entities. Setup a public project, promote it, and have buyers order with a Dialogue form where they can mark an area that they want to purchase. Deliver with the Export 3D tool.
It literally could not be easier.
4. Increase your communication efficiency by publishing your project
A lot of effort goes in to the communication of successful project. A key ingredient is making sure your material is easy to comprehend by people with limited knowledge about urban planning and its formal processes.
OpenCities Planner is a great way to share a 3D visualisation with the public. Combine 3D-CAD models or 3D volumes with relevant content such as images or videos, text and documents, GIS data and publish it with a few clicks.
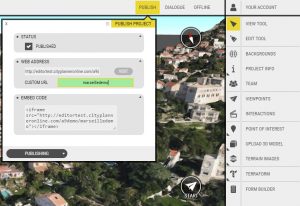
Go to Publish and set your project to ‘Published’. Publicise the link in social media or embed the project view on your web site.
That’s it. Now go get some easy wins.