Point/s of Interest are icons placed in the 3D-world with an optional popup window that can show text, images, links, and attachments. Add a Point of Interest by clicking in the 3D-world where you want to place it. You can change the position by dragging the icon in the map.
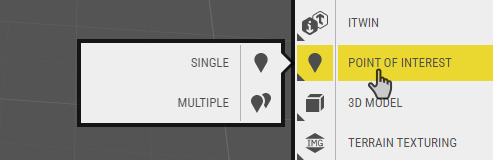
You can add Points of Interests in either Single or Multiple mode. In Single mode, you click the map where you want to add the Point of Interest and then you set the properties for that object.
In Multiple mode, you start by setting the styling properties and then you can add multiple points of interest with the same style by clicking on the map where you want to add them.
Point of Interest
From the dropdown menu on the single Point of Interest settings window:
Marker
These are the settings for the marker of your single Point of Interest:
- Position, including coordinates and altitude.
- Text label and font size.
- Style (Simple Marker, Icon Marker, Icon Only or None).
- Marker options: color and size (N/A for Icon Only and None style options).
- Icon options (N/A for Simple Marker and None style options.
On Click
You can configure what happens when the user clicks on a point of interest icon. The default action is to display a Details window with content that you upload in the editor. But you can also choose to Embed code, Run script and None.
Details window
The details window is shown when the point of interest is clicked. The settings for the window are:
- Title
- Image gallery
- Description
- Attachments
- Sharing
- Style options
- Start view
Interactions
This tab lists all the interactions that affect this object.
There’s also a Target link which creates a link that you can use to open the Details window for the point of interest from a web page. The link is HTML-formatted, so to use it in for instance the project window, you have to add it in Source code mode in the description field editor.
In-editor settings
This simply affects how your object appears in Object Manager.
Points of Interest
By selecting the Multiple mode, a Settings window open to set the styling properties of your Points of Interest. The settings window is the same as the one of the single Point of Interest, without the dropdown menu.
When finishing with placing your Points of Interest on your project, click on one of the and open its Settings window. In this one, you will see that the dropdown menu is once again available. This means you customize each point from the Multiple Points of Interest, separately.