With the Video export tool, you can create camera paths and export as Video and 360-Video.
Adding and editing nodes
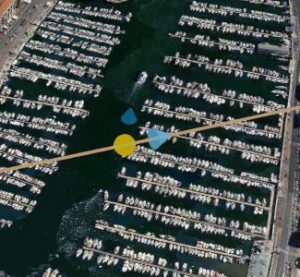
Start by clicking anywhere in the map to add a node. Click again anywhere to add another one. To edit a node, click on it and then you can reposition it. The arrow on top of the node lets you adjust the altitude, and the arrow in front of the node lets you control where the camera looks. Drag the arrow icon to reposition the look at.
If you don’t want to keep the custom lookat, you can click the purple line connecting the node to the lookat to reset it.
Animation controls
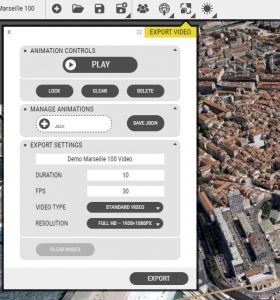
- The Play/Stop button controls playing a preview of your animation.
- Lock button locks a node and prevents editing it.
- Clear removes all nodes.
- Delete removes the currently selected node.
Saving and reusing animations
The animations will not be saved with your project but you can save your animation as a JSON file to reuse it the next time you work in the Editor. To save a JSON-file, click the Save JSON button. To reuse a saved animation, click the button with the plus icon and select the saved JSON-file.
The JSON-format is a plain text format, which means that you can edit in a text editor and reupload. This is useful if you for instance want to set all the nodes to the same altitude, which can be difficult to do with just the animation control tools.
Export settings
You can control the animation Duration, Frames per second (FPS), and the Resolution and Video type as Standard video or 360 video.
- Duration – The length of the camera animation in seconds. The smaller duration, the quicker the animation will be and vice versa with a longer duration.
- Frames per second (FPS) – the frame rate of your video will affect how smooth your video plays. If you go less than 20, then the video playback will be choppy. Default is 30 which is sufficient most of the time. It is advisable to start with a lower frame rate when you work with previewing your animation, because it impacts the time it takes to render a video.
- Video type – Standard is a regular video, whereas 360 Panorama video will let the viewer look around in full 360 mode while the video is playing. Note that there are a few extra steps you have to do after export if you choose 360 Panorama as the Video type.
- Resolution – the width and height of your video.
Exporting 360-videos
If you set the Video type to 360 Panorama, then there’s a couple of extra steps you have to do before you can view the video as an interactive 360-video. You need to inject metadata into the video file, which tells video players to display your video in 360-mode and not standard mode.
To to so:
- Inject metadata into the video file with the Spatial metadata injector tool or similar applications.
- Convert the .webm file that you exported to .mp4
- Run the metadata injector tool and select your video. Make sure that you select “My video is spherical (360)” and click “Inject metadata”
The tool will now output a video with the 360-metadata injected. You can now view it in standard windows video players or upload it to youtube and similar video sharing services.

